
When you buy a new dishwasher from an appliance showroom like Atherton Appliance & Kitchens, it includes delivery and installation of your new dishwasher. But if you buy your new dishwasher from big-box stores or online retailers, you may be faced with installing the unit yourself.
If you are tasked with installing your own dishwasher, the good news is it’s a fairly easy job with the right tools, directions, and a little patience.
Project Overview
Total Time: 2-3 hours
Skill Level: Intermediate
Estimated Cost: $20 excluding appliance
Connecting a new dishwasher requires three connections:
- Power-cord connection
- Water supply connection
- Drain line connection
The Power Connection could be the trickiest part, especially if you’re not comfortable with electrical work. Dishwashers can be “hard-wired” with an NM circuit cable that feeds directly into the wire connection box on the dishwasher, or more commonly they’ll come with a standard appliance cord that plugs into a wall outlet under the sink.
Whatever the case may be, electrical code requires that a dishwasher be served by its own dedicated circuit, and if yours is not wired this way, it’s a good idea to have a new circuit installed at the same time you replace your dishwasher.
The Water Supply Connection is as easy as connecting one end of a braided steel supply tube to the water inlet valve on the dishwasher and connecting the other end to a shut-off valve on a hot-water supply pipe. The supply tube is basically a longer version of the same tube that feeds your sink and toilet.
Hooking up the water supply line to the dishwasher usually requires attaching a special brass fitting known as a dishwasher 90. It’s a 90-degree elbow that allows the supply tube to easily connect to the dishwasher. The fitting is normally included with the connection kit that also includes the braided steel supply line.
The Drain Hose on a dishwasher is a pretty simple job. The drain hose connects to the drain trap under your sink. On the way to the trap, it either loops up to the underside of the countertop under the sink or is attached to an air gap fitting.
Whatever you choose will depend on the code requirements in your area, but both methods are intended to keep dirty wastewater from siphoning back into your dishwasher. As the drain hose loops back down, it’s attached to a nipple on the garbage disposal or directly to a nipple on the sink drain tailpiece.
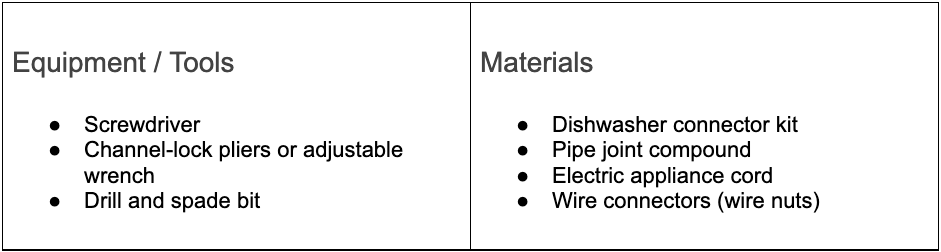
Tools You’ll Need to Install Your Dishwasher
Step One: Attach the Electrical Cord
You’ll find both the electrical hookups and the plumbing connections behind an access panel located on the front bottom of the dishwasher. While you can make the connections crouching or lying on the floor, you’ll find the easiest way to make connections is by carefully laying the dishwasher on its back to remove the access panel.
First, remove the bottom access panel and find the power cord connection fittings, the water inlet solenoid valve, and the drain fitting. Remove the cover on the wire connection housing and thread the power cord into the housing. Make the three wire connections: green from the appliance cord to the green grounding screw, white neutral wire to white dishwasher lead, and black hot wire to black dishwasher lead. These connections will be made with twist-on wire connectors, also called wire nuts.
Step Two: Hook Up the Water Supply
Your dishwasher connector kit should include a dishwasher 90 for connecting the water supply to the dishwasher. Installing the dishwasher 90 is step one in hooking up the water supply for your new dishwasher.
You’ll first need to locate the water inlet fitting on the solenoid valve. Apply some pipe joint compound to the threads of the dishwasher 90 fitting, then thread it onto the solenoid valve. Tighten it by hand, then tighten an additional quarter turn with your channel-lock pliers or an adjustable wrench.
Step Three: Attach Water Supply Line
Your dishwasher connector kit should also include a braided steel water supply line. Thread the coupling nut of the supply line onto the dishwasher 90 fitting, and then tighten with channel-lock pliers or an adjustable wrench. This is a compression fitting, so you will not need a pipe joint compound. Be careful not to overtighten, as you can easily strip the threads.
Step Four: Position the Dishwasher
Now it’s time to turn the dishwasher right side up. Slide the unit into place under the kitchen counter, then feed the power cord, water supply line, and drain hose through the holes in the sidewall of the cabinet. Line the dishwasher up to the center of the opening without pushing it too far back.
Use the adjustable legs to raise and level the dishwasher, following the manufacturer’s directions. You can unscrew the legs, using pliers if necessary, to bring the dishwasher up to counter height and make it level.
Step Five: Anchor the Dishwasher
Once your dishwasher is level and in place, you can fasten it into place to keep it secure. Open the dishwasher door to access the mounting brackets. Use the screws provided in your dishwasher kit to fasten the brackets to the cabinet frame under the lip of the counter. Now you’re ready to connect the water supply line.
Step Six: Connect the Water Supply Line
Find the water supply shut-off valve under the kitchen sink and connect the unit’s water supply line. If this is a first-time installation, you may need to install the shut-off valve on the hot water pipe.
Turn on the shut-off valve and check for leaks. Make sure to look under the dishwasher to check for leaks at the other end of the supply line where it connects to the dishwasher 90 fitting. If you see leaks at either location, gently tighten the fittings a bit more.
Step Seven: Connect the Drain Hose
The rubber drain hose will typically already be attached to the dishwasher. If it’s not, you can attach it using an ordinary hose clamp. Depending on your model and sink layout, there are a few possible configurations for the drain hose.
- The dishwasher drain hose can be attached to an air gap fitting mounted on the countertop or sink deck. This fitting will bring air into the drain hose to prevent wastewater from being siphoned back into the dishwasher. From the air gap, a second hose runs to either a nipple on the garbage disposal or to a side nipple on the sink drain tailpiece. The hose for the dishwasher is typically attached to the air gap with a spring clip, while the hose connects to the garbage disposal using a hose clamp.
- The dishwasher drain hose may be looped up and secured to the underside of the countertop, then drop back down to connect to a nipple on the garbage disposal or to the sink drain tailpiece. This “high loop” serves the same function as the air gap, which is to prevent dirty water from siphoning back into the dishwasher. Some local codes may not allow this method, however.
Step Eight: Test the Dishwasher
The final step is plugging the dishwasher’s cord into the outlet and giving the dishwasher a test drive. Before you put the face plate on the front of the dishwasher, test it by running the unit through a full cycle. Make sure that fresh water is being taken in and that drain water is flowing properly without leaks at any of the connections. If all goes well, you can put the face plate back on the bottom front of the dishwasher and pat yourself on the back for a successful installation.
Bring on the clean dishes!
Conclusion
If you find these steps to be overwhelming, don’t worry, we understand. At Atherton Appliance and Kitchens, we know all about dishwasher installation. Our internal team of installation experts installs them every day for our customers. If you’re in the market for a new dishwasher, sometimes the easiest way to success is to trust the experts. If that sounds better than installing it yourself, contact us today or visit our Resource Center for more posts, videos and webinars.